Wednesday, February 29, 2012

Shaving Cream Fun

We've been experimenting with different uses for shaving cream lately.

Shaving Cream Snow Art


Mix shaving cream with white glue.
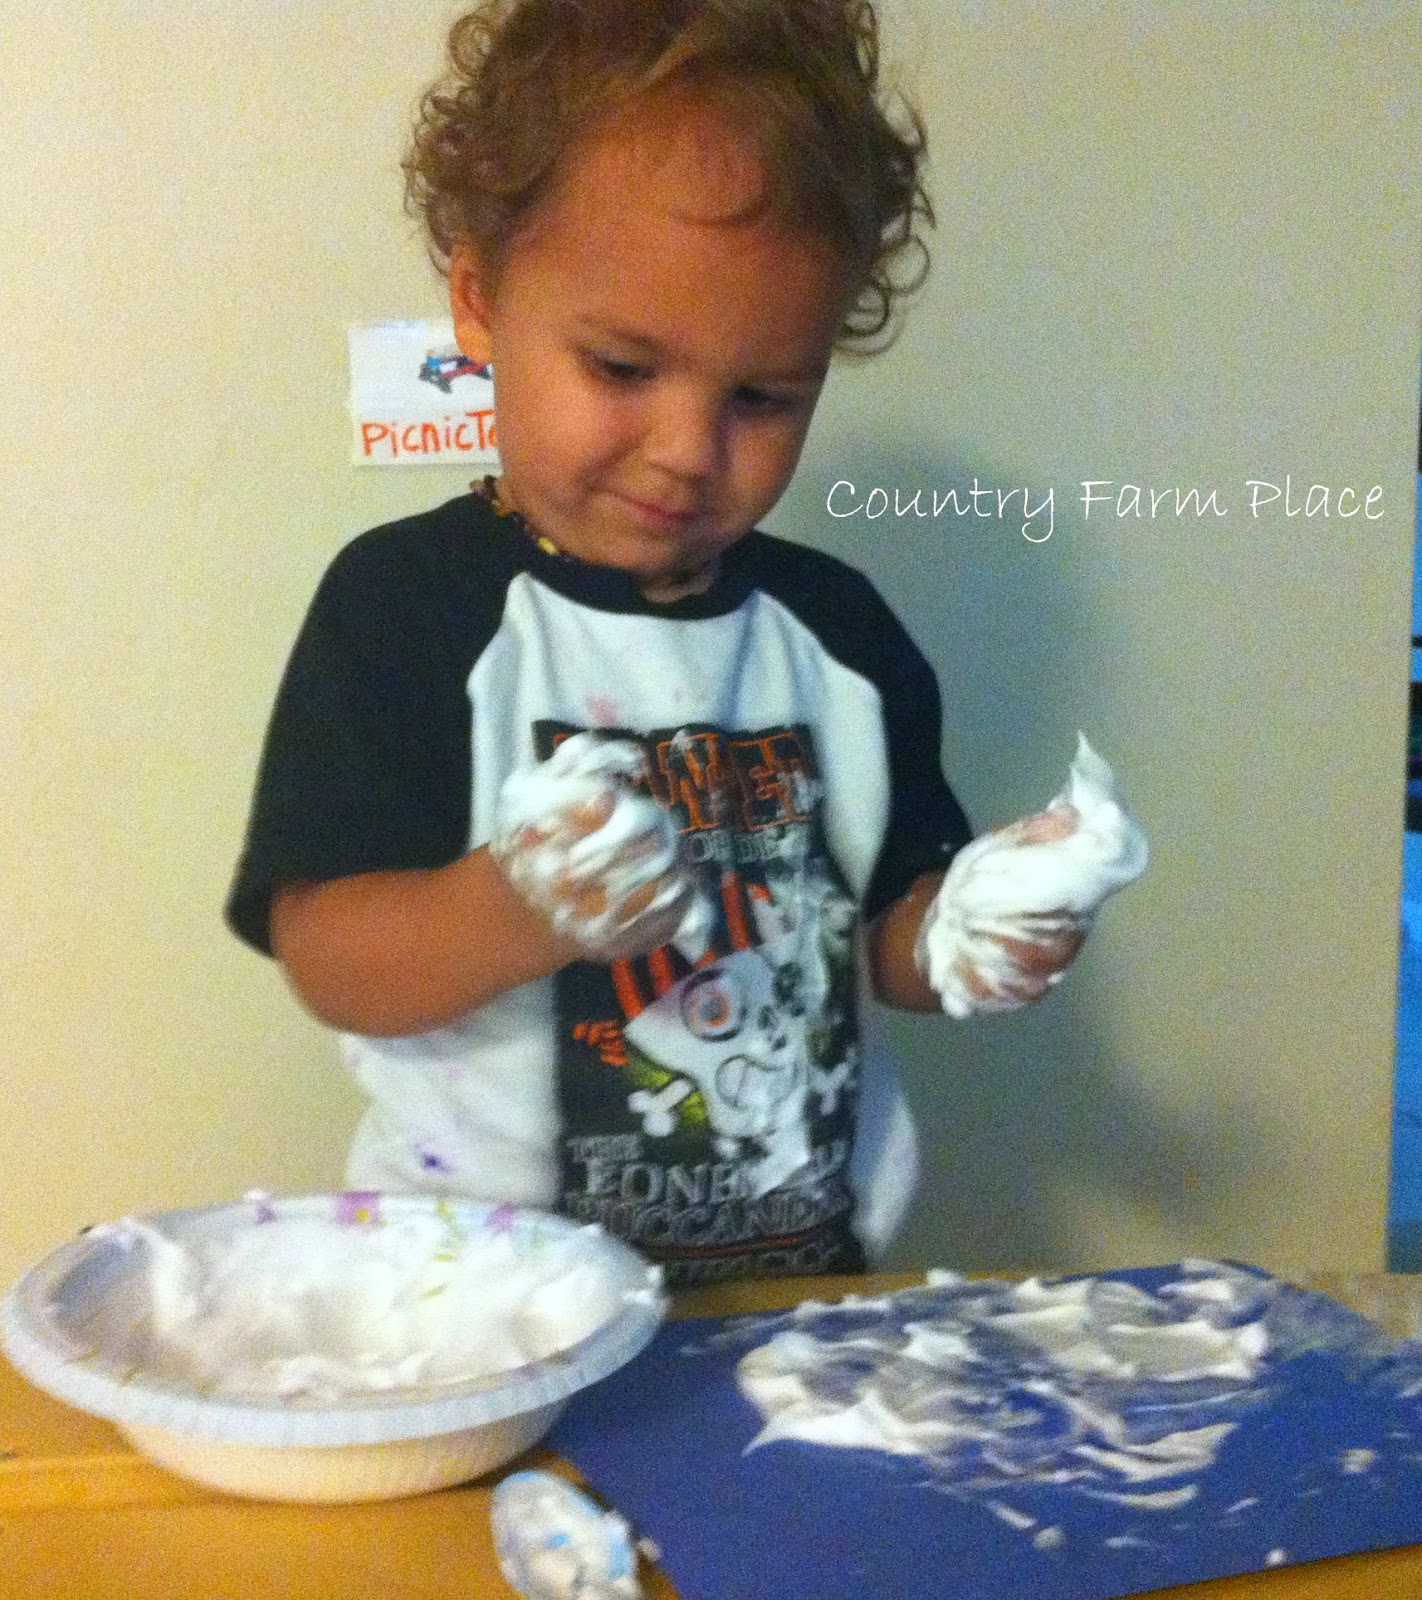

Super fun! 

He started out with a paint brush, and ended up just using his hands and getting it all over the paper and his body.


I love the way it dries! The picture doesn't even do it justice. It dries puffy...Bubba loved touching it after the "snow" dried.

Shaving Cream Paint


Okay, so this seemed like a brilliant idea, until it stained the shower tile grout and caused Bubba to have a reaction {from the food coloring; we follow the Feingold program, and silly me forgot that he can't use products which will be absorbed through the skin that contain artificial coloring}.


But he sure did have a blast painting in the tub, and for the most part is washed away clean. I'm still working on a solution for the dyed grout though - I'm not to fond of red and blue spots in the guest shower.

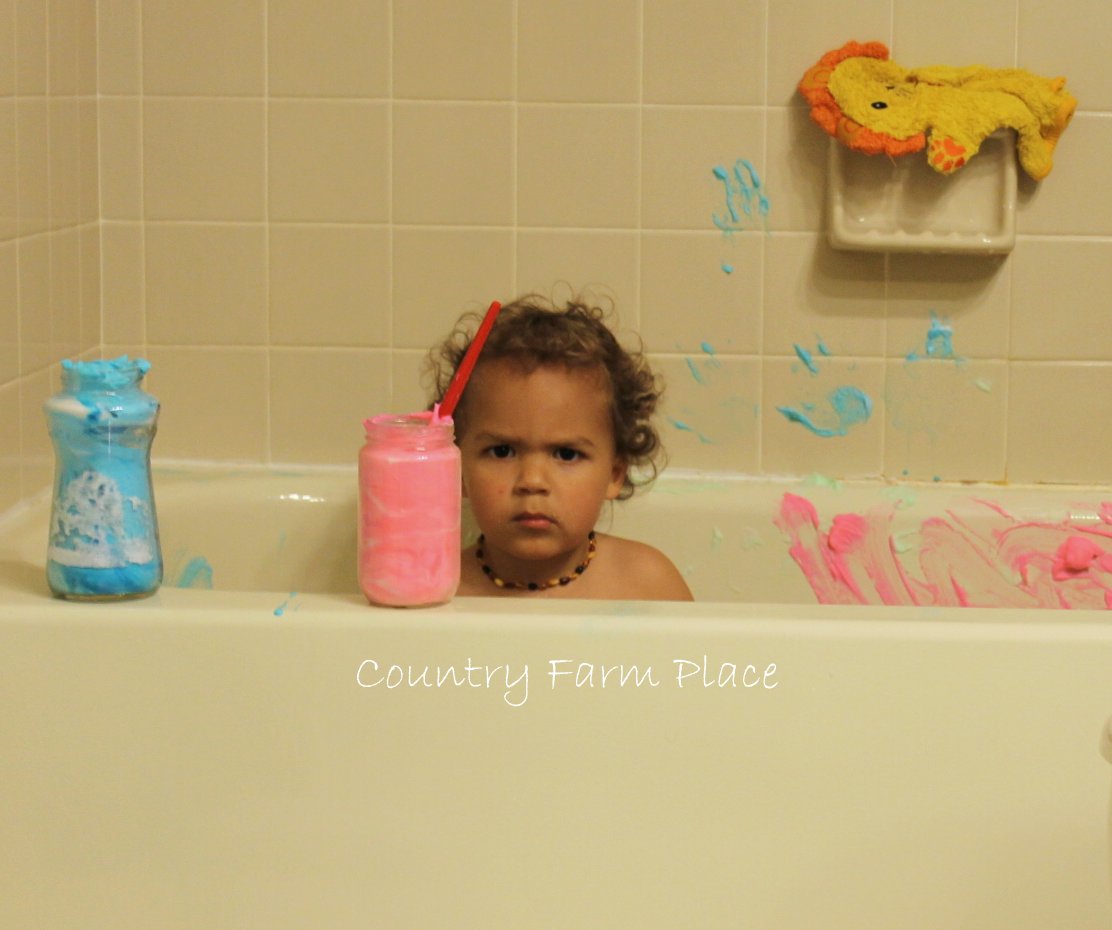
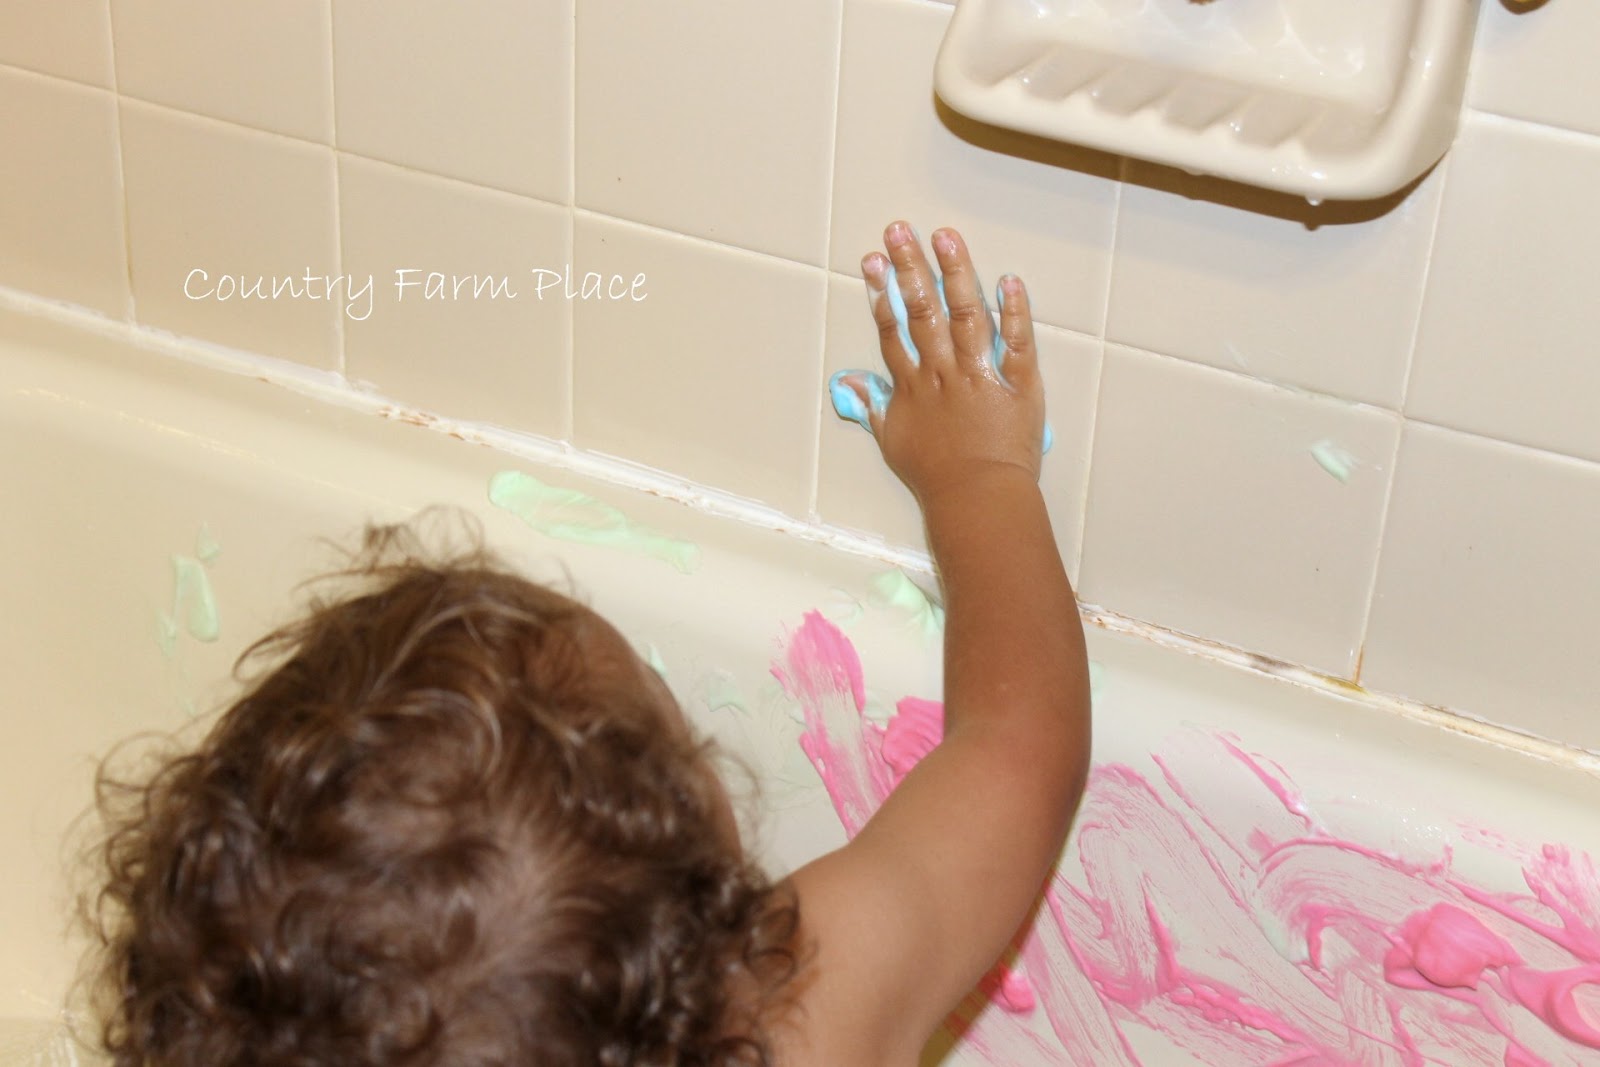
*Update: While I try not to use a lot of chemicals to clean, I ended up using 409 and a toothbrush to scrub the grout clean, and all of the color came off!

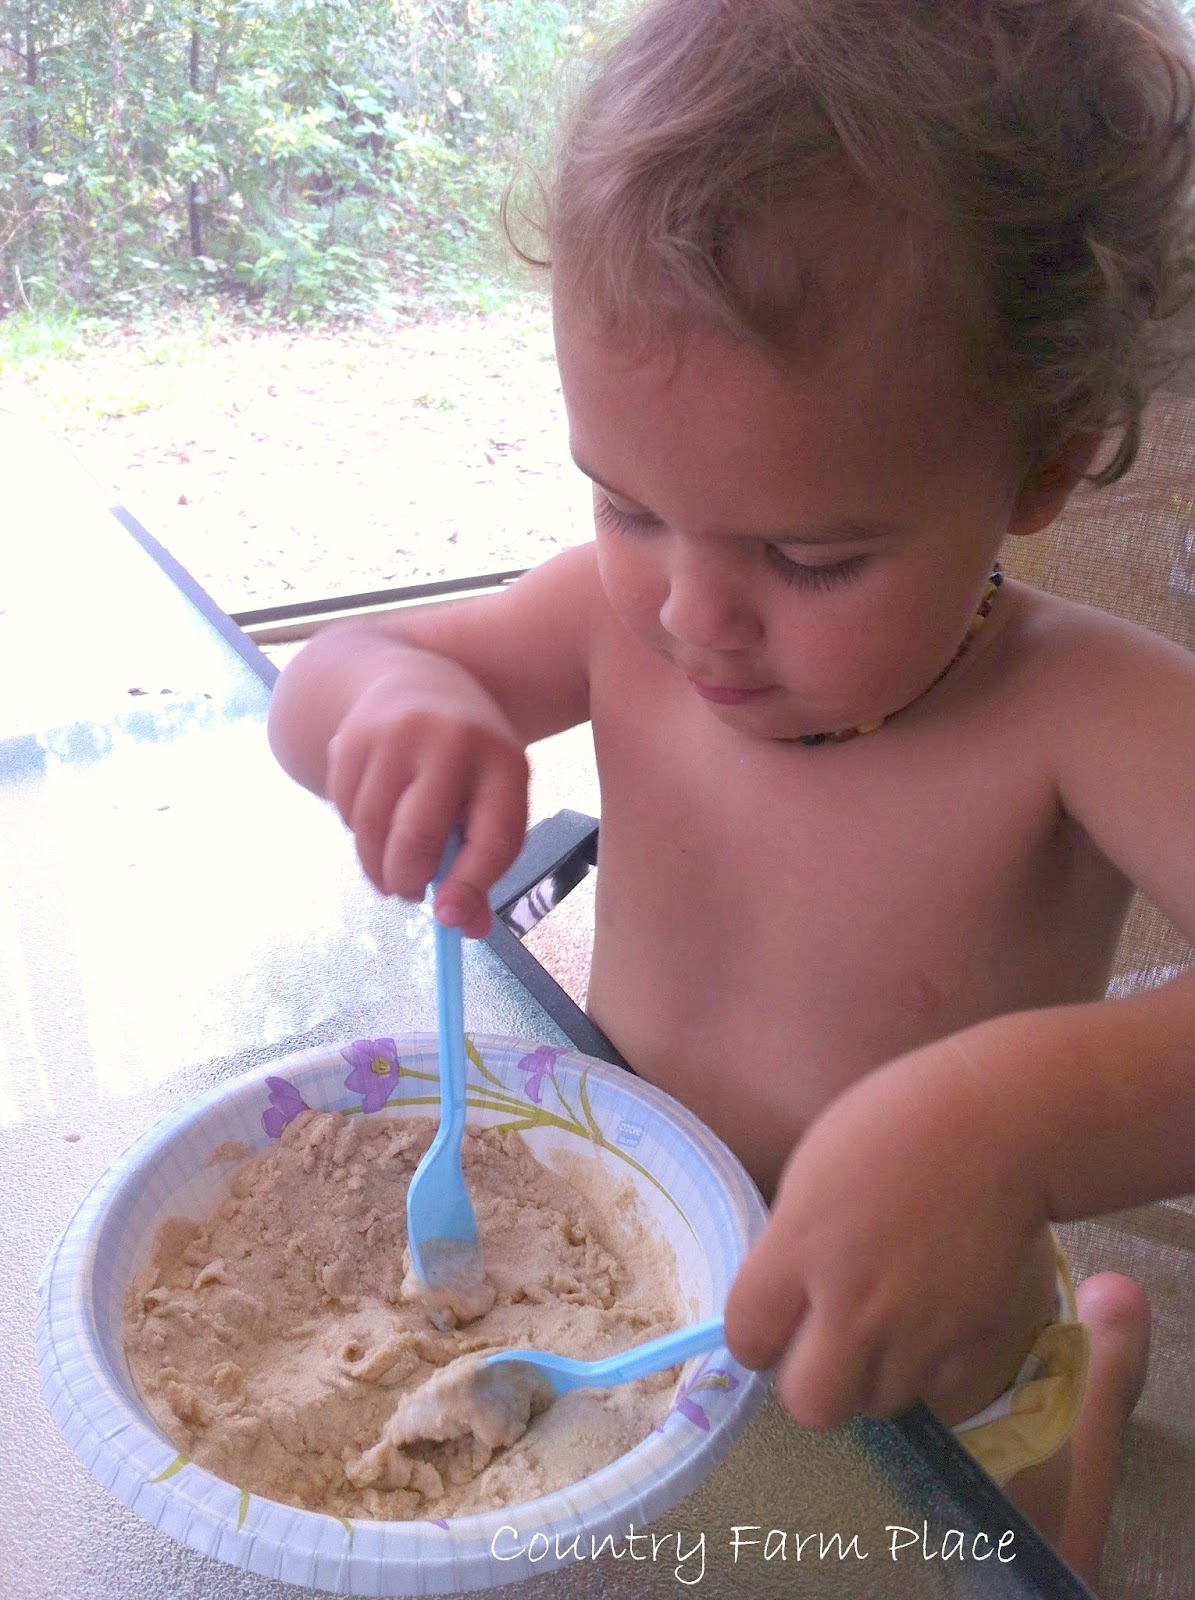
Shaving Cream and {Packing} Peanuts

I saw this idea on Earth's Kids, and thought Bubba would really enjoy it.


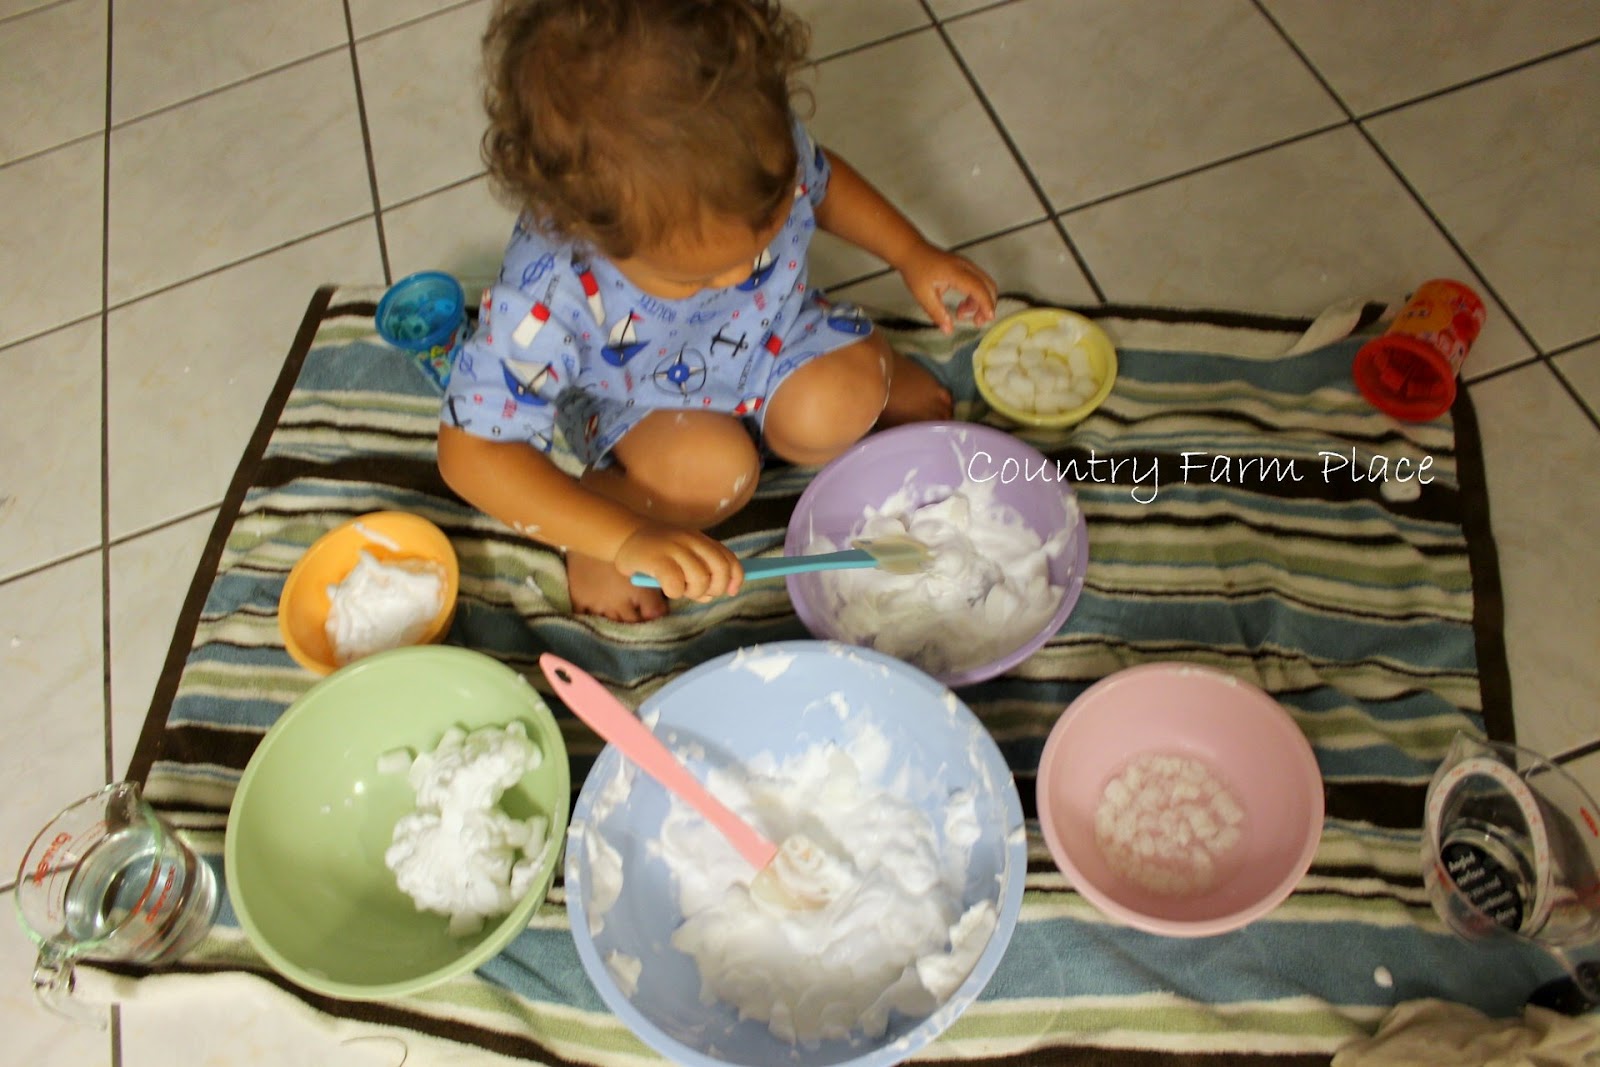
We set up bowls filled with different combinations of materials {like the directions suggest}.

- Shaving cream/peanuts/cold water
- Shaving cream/peanuts/warm water
- Shaving cream/peanuts
- Shaving cream/water
- Peanuts/water


By that face, you would think that he loved this activity.


Alas, the enthusiasm was short lived. 

For a kid who normally doesn't mind getting his hands dirty, he sure did not like the way the shaving cream, peanuts, and water mixed together felt on his hands. 

You can find more shaving cream fun activities at ABC Home Preschool.

Sunday, February 26, 2012

Chalkboard Storage Boxes


You may have figured out by now that I am mildly obsessed with turning anything and everything into a chalkboard [here, here, and here].

So what is going to stop me from taking my empty food boxes and turning them into chalkboards?

Absolutely nothing.

I saw this in Family Fun magazine a few months ago, and thought it was a fabulous idea.


All you need:
Small Cardboard Boxes {such as a cereal box, milk carton, cracker box}
Exacto Knife
Chalkboard Spray Paint
Chalk

Cut off the flaps of the boxes with the exacto knife. Or if you use a milk or heavy cream carton, like me, carefully cut off the top.


Make sure to clean your dairy cartons very well. 

Spoiled milk residue is not a lovely smell.Spray the boxes with the chalkboard paint. I stuck a piece of packing paper in the box {with a bit sticking out of the top} to prevent the paint from getting on the inside of the box. I figured this out after I began painting the first one when the paint was spewing little bits on the inside.


Draw pretty designs, or let your little ones draw on them. 

Enjoy your new stylish {and inexpensive} storage solution.

Thursday, February 23, 2012

Thursday Things

{March issue of Real Simple}

"Beauty is in the eye of the beholder, and it may be necessary from time to time to give a stupid or misinformed beholder a black eye."

(1) Oh Miss. Piggy, you are so wise.


(2) Super excited that we got a fun new camera!

Would someone please come show me how to use it?

Seriously. It really confuses me, beyond the basic settings. 


(3) I'm considering making homemade cloth pull ups. 

Who thinks I'm crazy? 

{I do}

But I am refusing to pay $24 per pull up.

Insanity! I'm not made of money people!


(5) BBQ Salmon Burgers - Ummmmm, yes please. 

(6) I think my heart pumps barbecue sauce instead of blood. Forealio. 

(7) And for dessert, the Best Cranberry Cake Ever.

(8) I'd like to thank Publix for their weekly BOGOs. Without them, I wouldn't have a bag of cranberries sitting in my freezer since December waiting for me to discover this recipe.

(9) Blueberry season is almost here - I will be making these Vanilla Almond Blueberry Crumb Bars.

(10) I see the fat kid in me coming out .... 3 recipes in a row - I definitely have food on the brain. 

(11) Thinking of making this Paper Tree for Bubba ... it might be a lot of work though, and I don't know how I feel about that.

Happy Thursday! 

Wednesday, February 22, 2012

Let's Talk Cloth


Even though Hubby was very much against it {I, on the other hand, had wanted to use cloth since birth}, we started using cloth diapers just after Bubba's 1st birthday. We switched for a few reasons:

(1) Cost - after figuring in the cost of washing and purchasing them {we bought most used - yes, you can buy cloth used, they are washed after all} it was just more economical to use cloth. Being a one income family, anything that can save us money is the best choice. 

(2) Eco-friendly - over 92% of single-use diapers end up in landfills (source). And even though we still use disposable at night, the more we use cloth, the more we are helping our environment. 


(3) They are just so stinking cute! - from the patterns on the fabric, to the way he used to waddle from the padding. Cloth diapers are just adorable. 

(4) Convenient - we never run out. Have your ever had one of those days when you go to change your baby and you realize that you are out of diapers, or only have 1 left? Yea. That happened to me once. Luckily, now all I have to do is throw his diapers in the wash, and we're all good. 


Choosing what kind of diapers to use is totally a personal decision, and I am by no means an expert. I personally think you really have to be committed to using cloth, because, let's face it, the whole world pushes disposable and kind of looks at cloth diapers as a weird,  thing. But I LOVE it; and I think you might like it too if you gave it a chance. 

Anyway, let me get to the point of this here post:


Do you cloth diaper? Do you want to help set a Guinness World Record?

 If you said yes to those questions, then this upcoming event is for you! 

At The Great Cloth Diaper Change, on April 21, 2012, parents around the world will attempt to break last years record for most cloth diapers changed at one time.


If you live in the Tampa Bay Area, then you should head down to Great Explorations Children's Museum in St. Pete, and take part in this awesome event! Last year 5026 babies were changed! Not only can you take part in breaking a record, but you will have access to the whole museum - so much fun!


While the event is free {a $5 donation is encouraged since the museum is being opened for the event all day}, you must pre-register to take part in the Great Cloth Diaper Change. Visit the registration website here.

For more info, visit the Great Cloth Diaper Change Tampa on Facebook. 


Don't live in Tampa, but want to participate? Go here to find a location near you!


No location near you? No problem. Go here to host a location!  

Tuesday, February 21, 2012

Office Space

Our master bedroom makeover has come to a halt while I am searching for good deals on curtain rods, and figuring out what pattern to paint on the rug and curtains. So I decided to start working on the spare bedroom/office over the weekend.


I began with this empty wall, that really needed some filling in. I didn't think I needed to include a picture of a bare wall - I'm sure you know what that looks like. I had it all laid out with the paper, but silly me forgot to take a picture.


I still want to add one more fabric hoop, something in that empty space above the chalkboard contact paper {any ideas?}, and something above the shelves and frame. 


I used chalkboard contact paper to create a weekly schedule center. I am obsessed right now with turning anything, and everything, into a chalkboard. 

 If I haven't said it enough, chalkboard contact paper is awesome sauce. You can cut it into any shape you want, stick it on, and BAM! instant chalkboard. Really? How much easier can it get?

I used regular chalk to write, but I really want to get a chalk marker


I used pieces of a pallet that Hubby cut to make a stool awhile ago. Needless to say, the stools were never made {because I found a couple stools at a yard sale and painted them - much faster than waiting for him to make one. Love you, honey!} 

Anyway, for the shelf, all I had to do was drill 2 holes for the screws to go through to hang it up. For the ribbon hanger, I drilled 4 holes on either side for the dowels to go through; and 2 holes on the top and bottom for the screws. 

I may have had to buy 3 different sized dowels to figure out which one would fit the holes I drilled. So, make sure you get the right size the first time. I even brought the drill bit with me to Lowe's the second time to find the exact size, and ended up needing something smaller. I was smart the second time though, and I went ahead and bought the smaller size just in case. 


I really love them; and I'm so glad that I left them unpainted. Sometimes, I tend to want to paint everything in site, but I'm happy that I left these shelves alone. 

Happy decorating!

Monday, February 20, 2012

Wonderful Weekend

We had a very laid back weekend. No set plans. Fly-by-the-seat-of-our-pants kinda days. Which is good, but I felt sort of lazy, because I didn't accomplish much. 


Bubba and I went to a few yard sales on Saturday. We found a couple games that he has enjoyed "playing," for only $.10 each - my kind of prices.

By playing, I mean that he just does his own thing - no rules, just right. 


 We also picked up 4 hula hoops for ... FREE. So that is awesome sauce.

Bubs kinda got the hang of it; he would spin the hoop around himself, then shake his little booty. It was way too funny.  


I also started working on decorating/cleaning up the spare bedroom/office. 

Look for that post soon.

Hope y'all had a wonderful weekend, as well, and Happy President's Day!

Thursday, February 16, 2012

Thursday Things


(1) While other parts of the country/world get to enjoy real snow...we got to have a snow day at Tampa Bay Skating Academy with our play group. 

(2) I think 80ยบ is the perfect temperature to play in the snow, don't you?

(3) Is it odd that we left the snow day wearing shorts and a t-shirt? 


(4) So excited about the new ruffled shower curtain I just bought for our master bathroom makeover - for only $19.99!

(5) Hubs may not be as thrilled as I am, but he's not going to be home for quite awhile. So, I'll deal with him when the time comes.


(6) I think Bubba would flip out if I make these cupcakes. He is seriously a choco-holic.


(7) I really LOVE getting packages in the mail. 

(8) Especially, when they are filled with all of the fun goodies that I have ordered from Fabric.com and Mindy's Minute Market

(9) Although, a package full of things that I didn't have to spend any money on would be even more amazing. 

(10) It really would have been nice if my shower curtain had arrived at the same time. 


(11) I picked up this ginormous box of plastic eggs at a yard sale last weekend. Now, I just have to come up with fun things to do with them all. 

Happy Thursday! 

Be excited...the weekend is almost here!

Wednesday, February 15, 2012

Sand Beads


This has got to be one of the easiest crafts I have ever done with Bubba. Although, I still did most of the work, he really enjoyed trying to help. {but really, who doesn't enjoy crafting when they aren't the one doing it. It's so much easier to enjoy the end result.} 

This, easy-as-pie craft, only really requires two things:


Glue and Sand. 

You can get fancy, like us, and dye your sand with food coloring. But it really isn't necessary - you'll paint them in the end anyway. 

You may be thinking, "It's winter here! Where the heck am I going to get sand?" Well, my friend, I know I live in a tropical paradise not really though, and it is very true that I have year round beach access, but! I did not get this batch of sand off the shores of my local beach. We have a very large bag of sand sitting in our garage that was left over from a project Hubby completed months ago; this is my attempt at getting rid of some of it - one cup at a time. My point is, you don't have to be at the beach to get sand. If your kid has an untouched sandbox (or table), then you most likely have some sand sitting around, and I'm sure the kids will spare you a cup or two for a fun little craft for them.

Or you can just Pin this project, and wait until after your next family trip to the beach over Spring Break or Summer Vacay to make these little gems. 


I didn't really measure, but I'm going to say we used about 1 1/2 cups of sand and 3/4 cup of glue...give or take. 


You just want to be sure you have used enough glue to form a stiff dough. 


Shape the beads, and poke a hole through the center. We used an unsharpened pencil, but you could also use a straw, toothpick, or anything else you may have on hand. 

{Side-note: for some weird reason, we have a million unsharpened pencils floating around my house, yet we have no pencil sharpener. I'm not really sure how that is supposed to work out.}


Let dry for 24 hours. 


We let ours dry overnight, but in the morning I was dealing with a very impatient toddler who would not stop saying, "I paint. I paint in morning. Mommmmmmyyyyyy, paint!," in a very whiny voice. So, I popped them in a 200ยบ oven for about 8 minutes {and we played Hungry Hungry Hippos while we waited}. 


Once they were cool, he finally got to paint {thank goodness}.

Make a necklace. Make a bracelet. Use for other projects. Just have fun with them.

We haven't had a chance to make anything with ours yet. We got side-tracked with a million other activities while waiting for the paint to dry, and just haven't had a minute to come back to them. 

Happy Crafting!

Tuesday, February 14, 2012

Toddler Tuesday

This is totally late due to our crazy valentine's celebrating today. We left the house at 9:15 AM and didn't return until almost 5 PM - just in time for dinner, bath and bed time. Needless to say, I didn't get a whole lot done at home. 

But here it is...a sampling of the fun things Bubba gets into each week, here at Country Farm Place.
--------------------------------------------------------------------------------------------------------------------------------------------------------------------------------------------------------------------------------------------------------------------


This guy is going to be a future baby wearer {he calls his elephant his baby}.


Bubba's new favorite activity is printing pictures on the little photo printer {thanks Mimi - I bet you didn't even know we still had this}.


I made Bubs his own personal magazine. Now, he doesn't have to destroy mine while he's "reading."


Having fun with water beads. 

{Side-note: I have found another good use for my old year books}


And, of course, the requisite self-portrait.

Hope everyone had a wonderful Valentine's Day!

Free Shipping at Abe's Market

Head over to Abe's Market and get free shipping on your order, today only!

Don't forget that you can still get 15% off on your order also, with code Deal15!

Sorry I didn't include any links....I'm blogging from my phone app. :)

Last Minute Valentine Projects


I found a pile of wood boards up in my attic, and wanted to make something out of them. I started making a sign last month for Gasparilla, but just didn't have a chance to finish; so I decided to turn it into a sign for Valentine's day.


I took two pieces and used Gorilla Glue to glue them together. 


The clamps we have didn't fit around the two pieces, so I used a few heavy books as weights to help them stick together. 

{Side-note: I'm glad that I have been able to find a use for my old high school year books.}


Done.

 Then I spray painted the board with a coat of white because I originally planned on wanting a white background. However, since I never finished last month, I decided to give the board a coat of red paint to use it for Valentine's decor. 


Using my Cricut, I cut out letters on white contact paper. Before I stuck them to the board, I laid them out to make sure I liked the way they were positioned. 


You can't really tell by the pictures, but I did distress the sign a little bit. I'll have to get my sander out to make it more noticeable .... I just have to get more sand paper for it first.


Sunday night I realized that I didn't have anything made to give to Bubba for Valentine's Day. Luckily, I bought a bag of miniature dinosaurs the other day at Target. I didn't know what we were going to do with them yet, so I pulled a couple out and wrapped them in red crepe paper. 

I was inspired by this peach surprise {awwww...I'm a horrible blogger. I thought I pinned this from another blog, but can't find it. If you know the original source, please let me know}. 

I used a piece of pipe cleaner for the stem, and cut a leaf out of construction paper. Super easy...and he will have lots of fun unrolling this! 


I finally finished this Mail Man bag for Bubba! 

I started working on it a couple of weeks ago, but I was procrastinating cutting out the stencil for the logo.

I had hoped I would have it complete in time for our play group's valentine exchange party, but that did not happen. However, we have another Valentine's play-date today, so he will be using it to pass out his cards to his friends this time. 


P.S. Let's ignore my horribly basic sewing skills. 

Did you have to work on any last minute Valentine's projects yesterday?

Happy Valentine's Day!