Sunday, April 29, 2012

MIA

I know that I have been completely absent the last few weeks. Recently, I have been so overwhelmed with weddings, showers, traveling, and just day to day life. 

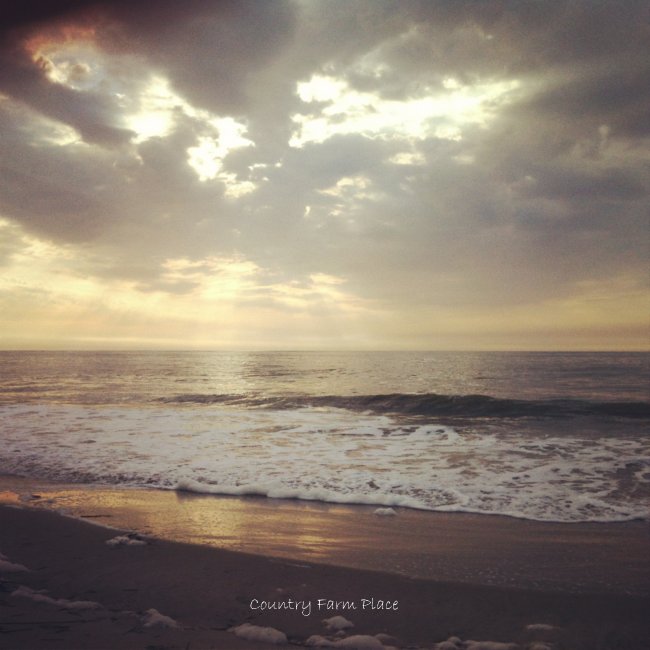
Wild Dunes, South Carolina
I don't know if I have really mentioned it before, but Hubby has been deployed {sort of - it's kind of hard to explain, so we'll just leave it at deployed} since November, and was supposed to be returning in May. Until it was decided that he would be staying where he's at {again, kind of. He doesn't really stay in one place for long} for another 4 months. 

With Hubs being gone, taking care of the little guy, and just keeping up with everything else in our lives that has to be taken care of....I am completely worn out. It has been hard for me to find the energy to get any of our home projects done, craft with Bubba, and write. But, after my {very } short getaway last weekend, I have recharged my batteries {as much as I could}, and am ready to face off with the next few months.


With all that being said, this is what we have been up to:


Sil and I took a trip up to South Carolina for one of our best friends wedding.


It rained during the ceremony, but the pay off was this gorgeous rainbow that appeared right after they were pronounced husband and wife. So AWESOME!


Sil caught the bouquet. She claims that she didn't mean too; but it's quite fitting, since she will be my last un-married friend as of November.


We went blueberry picking at one of our favorite local blueberry farms, BlueYouth Berries. 


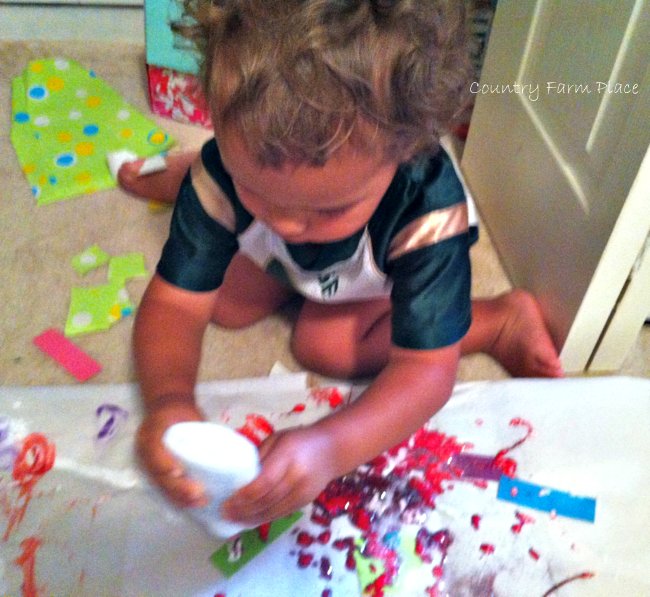
Creating beautiful works of art using glue, kool-aid, and pieces of paper. 


I've also been working with my friend Jill, on some projects to sell...visit our blog

After our upcoming trip to visit my brother, things should be pretty calm around here for a few weeks. Then, on to my best friend JJ's wedding (#2 of 4) in June. 


Hope everyone has had a wonderful weekend!

Thursday, April 19, 2012

Small Objects A-Z

I hope ya'll have had a great week! With Bubba slowly giving up his afternoon nap (grrrrr), I have been falling behind in writing. Plus I have been so exhausted lately, that when he does nap, I am laying down with him. It's just been one of those weeks.....

Since naps are coming to an end, I've tried to find things to entertain this little guy. I did a busy bag swap with a friend...but those activities don't seem to hold his attention for very long. 


So I put together a bag of small trinkets. 

Most of the items I found around the house, and I tried to find something to represent each letter of the alphabet. Why we have "junk" like this hanging around the house? I do not know; but it has certainly come in handy. 

Some letters have multiple objects, and I'm still trying to find things for O, Q, U, and V {but I can just add those later}.

He absolutely loves his bag of trinkets. I love that he will play with the things for hours...WITHOUT ME. 

When I am playing with him, I'll ask him to find me things that are all the same color. Or start with a certain letter, which is still a bit advanced for him, but he does surprisingly well for the most part.


It's fun to see how he plays with everything. 

He made a little sensory box with water beads, a few of the sea creatures, and a pirate {of course}


 He walked into my room the other day with the wand and tiara saying, "I'm a princess." 

Whoopsies....we've been watching too much Cinderella; and maybe I shouldn't have included those objects. 

He also tried to fly like a bird and flapped the feathers around like they were his wings. It was pretty hilarious...I wish I had video of it. 

Saturday, April 14, 2012

DIY Drummer Onesies & Burp Cloths


These little onesies and burp cloths made the cutest addition to the little drummer baby shower decor. 

Here's how you can make them yourself!


What you need:

• freezer paper
• image to trace
• x-acto knife
• paint & paint brush
• iron
• onesies & burp cloths

To create your stencil - trace your image onto the freezer paper, shiny side down, and carefully cut it out using the x-acto knife. For the drummer, I just google searched drummer silhouette, and for the words I typed it out in a Word document. 

Remember to save the little pieces that go inside the letters. 


Using low heat, iron the freezer paper onto the burp cloth or onesies, then paint the blank space. 

This ironing technique works great when you're not using the same stencil for multiple items. I did this for the first onesie, then ended up having to carefully hold the stencil in place for the rest. 

Once the paint is dry, remove the freezer paper. 

Or, if you're like my impatient self, remove the freezer paper before the paint is completely dry and touch up the spots you messed up by removing the paper too soon. 

Once the paint is really dry, go over the image with a warm iron {place an old t-shirt or cloth between the picture and the iron first!}.


For the burp cloths, I used Gerber pre-fold cloth diapers - available at Target. For the stars {seen in the picture at the top}, I used black glitter scrapbook paper - also from Target {pack of 2 for $0.99}. And the mini clothes pins I picked up at Michael's and spray painted black {chalkboard paint, of course. It was the only black paint I had available}

Friday, April 13, 2012

DIY Vinyl Record Bowl


I really thought it was going to be a lot harder to make these bowls. But it was actually insanely easy. 

I followed this easy tutorial, but I thought I would include a few pictures for ya'll. 


Place in a 200º oven for 8-10 minutes.


Quickly place inside of a bowl to shape the record. 

Use for storage, as wall art, or for a chip bowl {as I did}.

Thursday, April 12, 2012

Thursday Things

source

(1) To celebrate National Grilled Cheese Month, Bubba and I  had some friends over to play and eat grilled cheese sandwiches. I made The Bianca, pictured above.

(1.5) Mine didn't look as pretty as those in the picture though.

(2) This Jar of Hearts wedding guest book/favor is such a cute idea! I think it could also be tweaked a little to use at a bridal shower.

(3) I love that the Jar of Hearts idea stemmed from an obsession with the song by Christina Perri, because I kinda LOVE the song too.

(4) I love this Tangram-esque fabric puzzle.

(4.5) I'd make one for Bubba, but it seems like oh so much work. One day I'll have time to make it...maybe.
source
(5) Have ya'll been watching Frozen Planet? I have been kind of obsessed with it every Sunday night. It is probably the only show I make sure to watch now that I haven't been able to use my TIVO for the last few months. 

(6) I wish I had seen this on naturally dyed Easter eggs before we attempted to dye them. 

(7) Tomorrow is Friday the 13th…


Happy Thursday from Bubba!

*Hubby found it funny that we were using the inflatable pool instead of swimming in our pool - ya know, the big one that takes up half of our backyard, and got solar panels last year to heat it. Yeah, I wondered the same thing. 

Wednesday, April 11, 2012

DIY Vinyl Record Door Hanger

This door hanger was a very last minute idea. I was really done with making things for the shower, but 2 days before I thought my cute Easter Bunny door hanger didn't really fit the theme, and I needed something to replace it stat. 

Of course, since this was a last minute project, I didn't remember to take pictures of all the steps. But, it really was quite easy, and took me only about 20 minutes to complete. 


Cut out circles to fit the center of the record from scrapbook paper. 

Apply a thin layer of glue to the record, and paste on the circle. 


I printed out a picture of a drummer {the same one I used for the onsies and burp cloths}, then traced it onto another sheet of scrapbook paper, cut it out using an X-acto knife, and glued it onto one of the records. {If you don't like the drummer you can always replace him with a guitar, musical note, or anything else that fits your theme.}

I don't have a picture of the final step, but all you have to do is hot glue all of the records together. Then attach a piece of ribbon {also with a bit of hot glue}.


You end up with this adorable door hanger - perfect for a musical/drummer themed shower. 

This post linked up over at: 

Tuesday, April 10, 2012

DIY Vintage Record Cake Stands


I had intended on making a drum related center piece/cake stand for the shower. But ended up going a different music related route. I keep referring to the baby shower as a "little drummer" theme, but it was actually more of a music theme with drums being our main instrumental focus. 

I was inspired by these vintage record cake plates; but what I ended up doing is a simplified version. {I didn't even realize that they used candlesticks as their base until I went back to find the link for this post}


Prime and paint the candlesticks.


I used Krylon spray paint and primer. Then used a clear matte finish spray. 


There is a screw pictured, but I didn't end up using it. 

I just hot glued the record to the base. Hot glue works well enough, but I would suggest using a heavy duty super glue if you have it on hand. I didn't {and didn't want to run out and buy any}, so the hot glue worked for me.  


I stacked two together {but did not glue them}, and used a smaller record on top to make a 2-tiered cake stand. 

Also, it's worth noting, even though I wiped down the records before using them, since I didn't use the plexi glass, I laid down a napkin for the little pastries on the center stand to sit on. 

How To: Remove Wax from a Candlestick

I bought a couple thrifted candlesticks for the vinyl record cake stand I made for the little drummer shower. One of them had the end piece of a candle stuck inside. 

Here is the quick and easy way I got it out:


All you need is a blow dryer and plastic knife.

Use the blow dryer to soften the wax for a minute or two. I didn't time it, but know I didn't use the dryer for that long. Just remember to do this over a piece of cardboard or paper plate {or something of the sorts}. 

I found the best way to do this, was to hold the candlestick in one hand and the dryer in the other, and tilt the candlestick to one side. That way when the wax melted, it would drip on the cardboard and not run down the stick. 


Then use the knife to pop the piece out of the candlestick. 

Super easy! 


Monday, April 9, 2012

Wonderful Weekend

Started out with A Little Drummer Baby Shower.


And ended with a very low key Easter. 


I hope ya'll had a wonderful Easter weekend, too!

**Posts on how I made the decorations for the shower are coming soon.**

Friday, April 6, 2012

Egg Decorating

We had some friends over to decorate Easter eggs. 


I used my trusty chalkboard spray paint, to transform plastic eggs into a canvas for the kiddos to create beautiful works of chalk art. 


I got up extra early to make natural dye for Bubba, and boil 2 dozen eggs. 


I don't know what I did wrong, but the homemade dye didn't work too well. But he still seemed to enjoy it. 

We used a dye kit that I picked up at the dollar store for the rest of the kids, and they had a blast. 


They also got to decorate foam eggs with fun Easter stickers. 

I think my favorite was the chalk eggs. 

Have you decorated eggs yet?